Showing posts with label summer. Show all posts

Thursday, September 5, 2013

Welcome to Virginia

Dear Internet,
I guess I took an unexpected blog hiatus. I had given myself permission to slack off on blogging on account of the move. Then, I got behind - so behind I didn't even know where to start. So, I just never started. Whoops. It has been implied, however, that curious minds want to know.

I'll try to catch you up.

It was a week before we actually closed and moved into our house so we chilled at a pretty nice Residence Inn for a week. Admittedly, the cats were able to settle in more quickly than Ben and me.


When I say we moved into the house what I really mean is "camped out." It was another three weeks before our stuff was delivered. Hence the photo here of our classy evenings together. Ben took his frustration out on our kitchen wall.


Does this remind you of anything?

I continue to struggle with the idea of doing one thing at a time so...


I had to do it, Internet. I mean, the master bathroom was brown. I'm actually quite fond of brown, but this particular shade in this particular room was a bit...off-putting. Perhaps a different angle will help you to better understand.


Sadly, neither the bathroom nor the kitchen has been finished.

After all, why spend time in a bathroom or kitchen when every inch of your neighborhood is begging me to come outdoors?


That's right, I took those photos in my neighborhood. Where I live. Don't be jeal.
Yeah right; you should totally be jeal. It is gorgeous here.

That's a snippet of my life the last few months. If you are very good I'll give you more snippets again soon!

Love,
J-

Monday, June 3, 2013

Suits me

We have a pool (for now). I love the beach. It may surprise you, then, to know how rarely I actually get into the water. As a result I only own two bathing suits. Well that and I can never find anything that fits right. There's either not enough suit (no bikinis for me), not enough support, or too much suit (who are these women with such long torsos?).

Suddenly, however, I am inexplicably gripped by the desire to buy a new swim suit. And, oh, some of the ones I seen online...


The husband isn't a fan, but this ruffled one piece from Wildfox is calling out to my whimsical side.

This beauty from J. Crew's Luxe Tulle line just went on sale. Look at the support that thing has! And ruching hides a multitude of sins often all too visible amongst beach goers. Sadly, the "regular" torso measurement is almost eight inches longer than my torso. Dear J.Crew, add swimwear to your selection for petites. Thanks.


Betsey Johnson calls this raspberry confection "Shortcake." Doesn't it sound perfect for me? I love that it has the feel of a strapless but still has the very thing needed for keeping your suit where it should be even in rough waters.

Now if I could rock a two-piece I'd seriously consider doing it in one of these.

 ChloeScalloped Halterneck

Classic retro bikini in navy from BeBops
Why is bathing suit shopping so hard?!

Friday, August 3, 2012

Hot Days of Homemeade: Two Months Down

I'll be the first to admit it, my summer without buying anything new has not been what I expected. If you remember, I issued myself a mission statement for Summer 2012:
This means I make my clothes if I want new clothes, I make curtains if I want curtains, I gift handmade gifts, etc. For things I cannot make, I will buy secondhand.
 But that's not really how it has gone so far.  Apparently, if I want new clothes I go to thrift and second-hand store to buy clothes. If I want new curtains, I covet a whole mess of expensive curtains and wait for fall to get here. I've done okay on the gift thing, though.

Imperial Candlewick (or Anchor Hocking Orchard Crystal) serving set I found for my mom

It isn't as though I haven't made anything. I did remake three pairs of pants and shorts (here, here, and here). I also put together a swanky blankie for my dear friend, Julie, and her new baby girl.

It has a fun,patchwork mix of textured fabrics for Baby Blake to enjoy and it is made entirely out of scraps.

Okay, I suppose I could give myself a little credit.  I'm still bothered by the amount of stuff I've managed to buy in just two months.  In fact, I think it might warrant further exploration. What say you, internet?  Do you find yourself buying things absentmindedly or are you strong-willed and impervious to marketing?

Tuesday, July 10, 2012

The Great Khaki Conundrum: Solved

Thank you thank you thank you, internet, for chiming in with regard to my unwearable khakis. I opted to go with cropping them even though most of you voted for the scalloped shorts. I also like the scallops and I still plan to work them into my wardrobe somewhere, but the pant legs were just too slim to go that short. Also, my mom told me I looked adorable in the cropped pants and mother always knows best.


I'm really really proud of how they turned out.  They're summery and chic, re-purposing them appeals to the tree-hugger in me, and they were virtually free.

would you like to know how to salvage an unwearable pair of your formerly favorite pants? Well, if you insist...

What you'll need:

  • Pants to alter
  • Iron and ironing board
  • Scissors
  • Straight Pins
  • Thread
  • Ruler
  • Sewing Machine

What to do:

Unlike me, I suggest you decide how short you want to go before you whack half a leg off your britches. For some of you, the issue you are trying to fix will determine the length. Once you decide on a length, measure the amount you'll cut from the bottom on both the front and the back of each leg. Why both sides? Well, on some cuts the back is slightly longer to accommodate the curve of your bum. If you cut through both layers of fabric based on the front mark your new crops might end up looking shorter in the back. Heat up that iron and press everything.


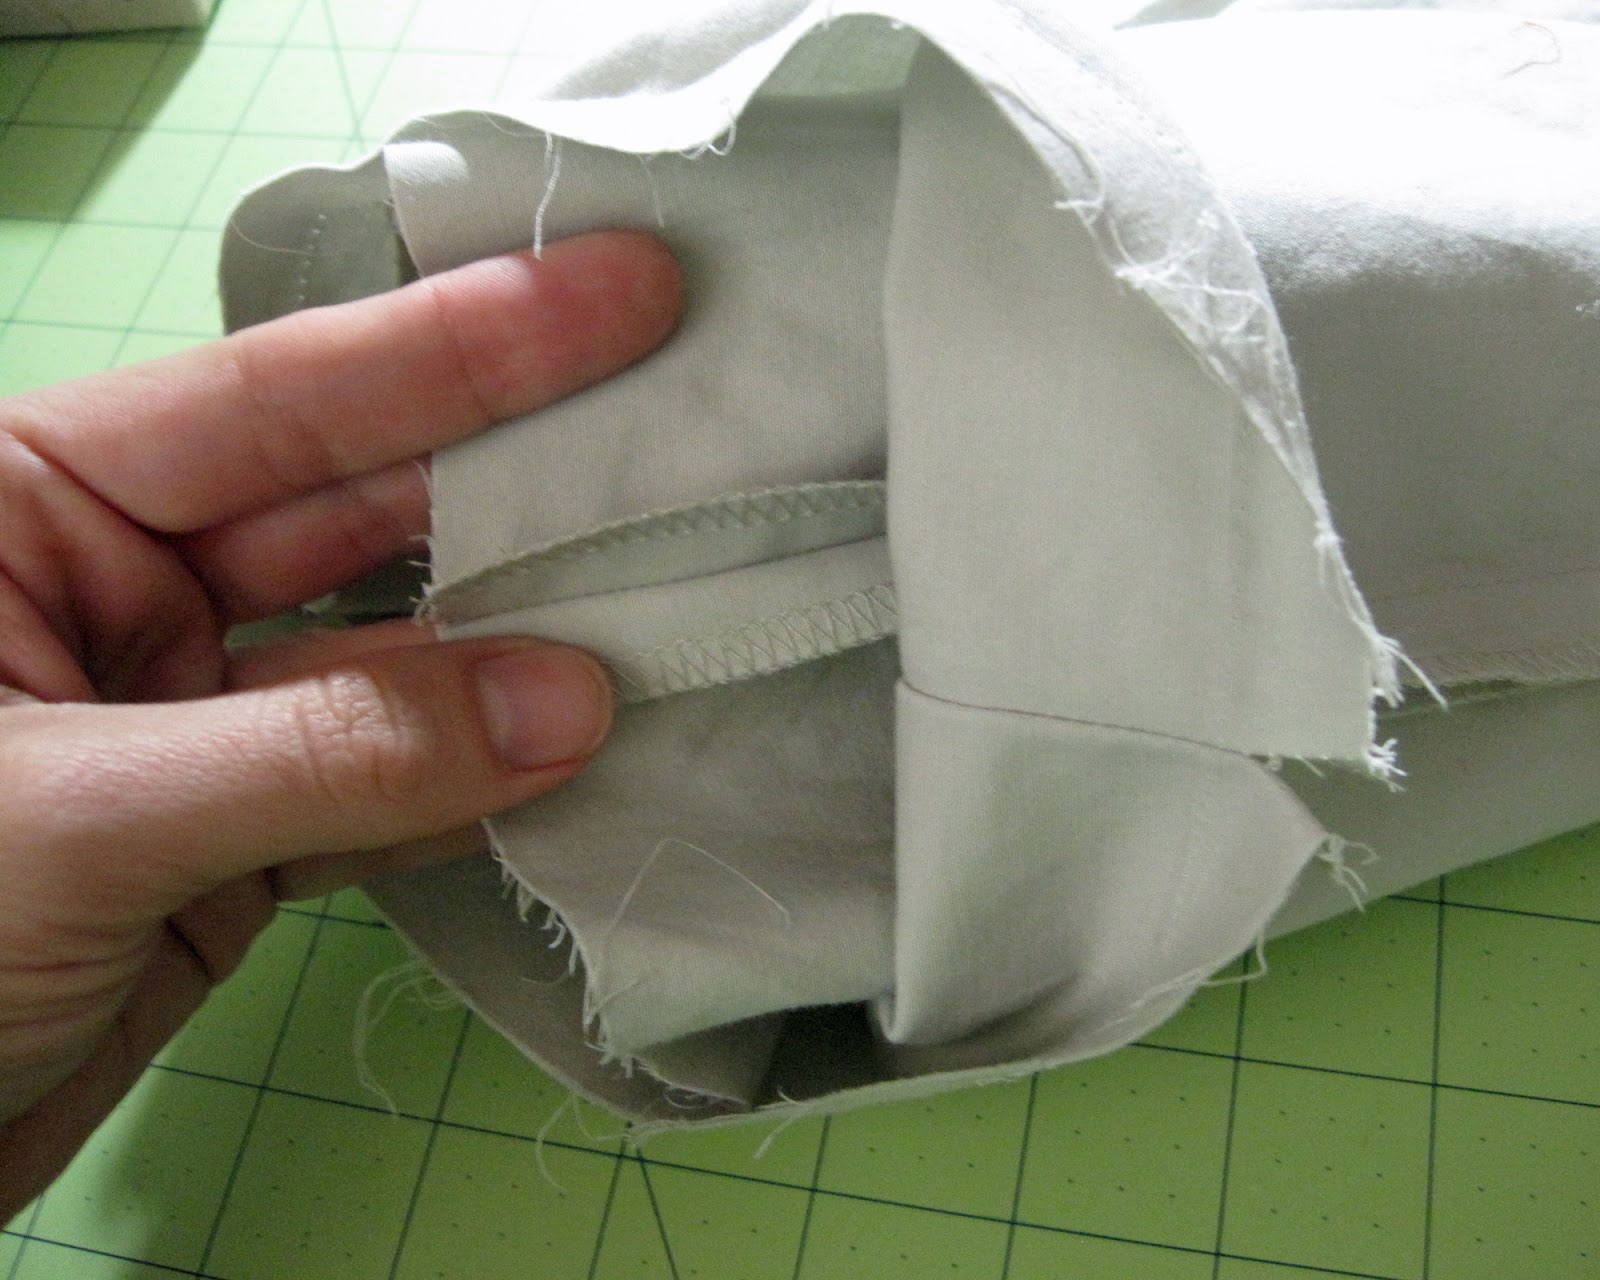
Next, I turned my (cropped) pants and the cut-off portion of each leg inside out. I slid the pants inside the pant leg so that the two cut edges lined up. In the bottom photo you can see that the wrong side of the pants will be sewn to the right side of the detached leg.


Those side seams really really need to stay lined up so I recommend pinning the heck out of that raw edge. then, using a straight stitch and 5/8" seam allowance, sew all the way around the bottom of your pant leg. Press the stitches to help set them.

Turn your pants right side out. You'll see that you've basically reattached the leg you just removed, except now it is inside out. Go ahead and press your seam allowances down.


Now we decide how large to make the cuff. I like a wide cuff which is good because, based on the location my original cut, I needed a cuff to cover that black goo stain. To be exact, I needed at least an inch and a half.


Armed with your cuff measurements, cut the inside-out pant leg twice as long as your finished cuff. To get to one-and-a-half inches I needed four inches of fabric; three to make the cuff and one to make sure my fold overlapped the seam where my leg parts were sewn together.

If you went into this project knowing how long you wanted your pants and the depth of your cuff you may have cut everything to length already. I'm sure your well-planned pants will look lovely, but the journey will be much less of an adventure compared to my trial-and-error process.

You are all very clever so I'm sure you know making cuffs will require fabric to be folded on top of itself. However, I soon realized that those side seams we lined up so carefully will quickly become bulky. To avoid issues later I recommend trimming the visible seam allowances on the lower portion of your pant leg.


Once you've cut the legs to the desired length, fold (or cuff) each leg so that the crease is at the final length for your new crops. You should now only be able to see the right side of your pant leg pieces. Press those babies.


We're almost there, Internet. Measuring from the bottom of the pant leg, find the place you'll fold to make the top part of the cuff. Measure, fold, and press your way around each pant leg.


Once you have a nice, even cuff pressed into place, pin that baby down!


I only used about an eight of an inch seam allowance from the top of the cuff when I sewed it into place.


Finally, press those babies and slip 'em on!


Ta da!

Okay, I lied. I actually did a little something more, but you'll have to wait until Friday to find out the how and what.

While you wait, though, why don't you tell me what sort of homemade nonsense are you getting into this summer?

Thursday, June 7, 2012

Lessons in fab: throwing an UnBirthday party

Every summer I say goodbye to my sweet Emily for a few weeks while she visits with her dad. This means each summer I miss her birthday. I know...it makes me sad too. But this year, that sweet husband of mine suggested we throw our poppet an early birthday; an UnBirthday, if you will.

It has been a few years since I last threw a party of any sort so I began stressing immediately. I had about a thousand ideas and so little time to execute them all. I mean, have you seen all the party photos out in the blogosphere?  People know how to throw a PARTY!  I knew I wouldn't be able to live up to all the internet fab nor my own expectations.  Luckily, I have Ben to remind me that throwing a good party is just like anything else - it takes practice.
We plan, we party, we learn, we repeat. 
That guy is so smart.

Just in case you don't have time to practice before your next big party I thought I'd share what I learned about throwing a party that is definitely eight-year-old approved.

1. Pick a theme.

I did some detective work and discovered Em wanted a party that centered around Disney's Tangled, and involved a pinata.

I'll be honest, I don't much care for children's themes. Don't get me wrong, I really like Tangled, but I didn't want to have Rapunzel and Flynn plastered on every surface.  The color palette however...

Tangled movie still via Polka Dot

2. Select fabulous invitations from an amazing stationary store.


Oi 'Hip Hip Hooray' invitation from Akimbo

3.  Practice your confection artistry before the big day.


My inspiration via Raspberri Cupcakes

My pancake-thin first layer. The day before the party. Whoops.

4. Entertain...


Making masks and crowns

5. ...entertain...


pin the hair on Rapunzel

More on that part below.*

6. ...entertain.


But try to not get your adult guests killed.


7. Provide good eats...


...or have your guests scavenge for their own.


8. Dish up your less-than-perfect but incredibly delicious cake creation.


9. Stop, breath, and enjoy!


10. Oh, and a few more things...

The ice in your freezer is nowhere near enough. Buy a big bag.

If the choice is between the roomy, sunny porch, and the smaller shaded patio, plan on everyone hanging on the patio.

Make your hamburger patties the night before. It might mean the difference between having your husband at the party and having him inside sipping a martini while furiously pounding out meat pucks.


*I see you jealously eying my Rapunzel game and who can blame you? The lovely Alicia Parsons of Akimbo designed it for just this occasion.


Lucky for you, Alicia is as magnanimous as she is lovely and is letting me offer it to you! Just right click on each of the images above above and tell them to "open link in new tab." Once the image URL opens, right click again and select save as. Voila! You now have you very own Akimbo print! Enjoy!

And if you have any party tip, mishaps, or stories, please share them in the comments section. I love hearing from you!

Thursday, March 29, 2012

Man Eater. Ew.

There's still time to submit your comment for a chance to win a custom garter. Find out how here.

Yesterday I saw this on Pinterest.

Black Milk Clothing 2011 (Suit not currently available)

No! No. No. No. No. No.  Nooooooo.

I get the humor; really, I do.  But there is just no reason the space between a woman's legs should be associated with sharp-toothed, gaping jaws that reek of dead fish. No reason at all!