Supplies:
fabric
3/4-inch, no-roll elastic
measuring tape
water-soluble fabric pencil
pinking shears (optional)
scissors
fray stopping liquid
straight pin
thread
safety pin
sewing machine
snips
I chose a rich dupioni silk in antique gold. Dupioni is actually my favorite fabric to work with because the texture keeps the fabric from being too slippery to work with and adds depth to the finish piece. It is also easy to prepare: hand wash, line dry, and iron.
You will first need to decide on the size of your garter. Measure the circumference of your thigh at the place you wish your garter to sit. For brides this is traditionally four inches above the right knee. Add 3/8 of an inch to that measurement. That is the length you want to cut your elastic. (My strip is 16 inches long).
The length and width of your elastic will help you determine the dimensions of your fabric. For the width, you need twice the width of the elastic (1 + 1/2-inch) plus an additional 1 + 1/4-inch for seam allowances. You'll want your tube to be snug, but not so tight that you'll have to fight to insert the elastic so add an additional 1/4-inch. That brings the grand total to three inches. There are two ways to determine the length of your fabric.
- Method one is to simply make your fabric 2 to 2 and 1/2 times the length of the elastic. In this case, that would be 32 to 40 inches long. The longer your fabric the more scrunch your garter will have. I almost never use 2 and 1/2 times the elastic length because I find the fabric will actually crowd against the elastic and prevent it from snapping back to its original length which means your garter won't fit snugly enough.
- I typically just stretch my elastic as far as it can possibly stretch and use that measurement as my fabric length. For the 16-inch elastic I got a total stretch of 31 inches.
 |
| The top edge is pinked and in the bottom right corner you can see where I took advantage of the fabric selvage to save time cutting and to ensure I started with a straight edge. |
Iron your fabric strip.
Now, fold your fabric strip in half long ways with the right sides together. Pin along the opening to keep your edges perfectly lined up.
Typically, you will purchase your fabric and your thread at the same time so they will match. I was working from my scrap pile so I just chose from the thread I already had.
If you cannot find a perfect match choose a thread that is lighter than your fabric.
 |
| I opted for the gold on the slender spool. |
Machine stitch along the opening, making sure to back stitch at the beginning and end and removing the pins as you go. Again, you want your tube to fit the elastic snugly, but not too snugly. I wanted my actual tube to be an inch so I used a straight stitch and a 1/2-inch seam allowance.
Snip all of your "dead ends" - that is, the tread tails where your seam starts and stops.
To turn the tube right-side out attach a safety pin to one end and push it inside the tube.
Scrunch the fabric over the safety pin, then gently pull down so that the tube slides over itself. Repeat until the pin comes out the other end of the tube. Continue sliding the tube over itself until it is completely right-side out.
Align the seam along the center back of the tube and iron.
Attach the safety pin to one end of the elastic and insert it into the fabric tube.
Repeat the scrunch and pull dance from above. Before the opposite end of the elastic disappears into the tube, pin it in place.
Continue scrunching and pulling until the safety pin comes out of the tube.
Grab both ends of the elastic, forming a circle. Overlap the ends and stitch. I use a straight stitch. First I make a box, then stitch an "X" in the center.
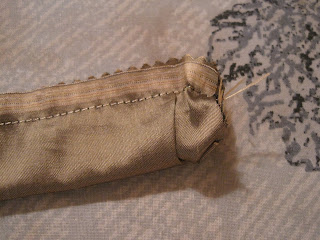
To close the tube over the elastic slide one end into the other. Be sure to fold under the raw edge of your outer tube.
Machine stitch. Turn and stitch again. Snip your dead ends.
Now stretch your garter a couple of times to distribute the rouching evenly and Ta Da!
I love hearing from you so use the comments below to let me know if you have questions or just want to add your two cents.


1 comment:
I really like your tutorial! Thanks for sharing it... It looks simple enough I just might try it!
Thanks Again!
Laura
Post a Comment